07 - Object detection - how to deploy a model in ROS
Robotics I
Poznan University of Technology, Institute of Robotics and Machine Intelligence

Laboratory 7 - Object detection - how to deploy a model in ROS
Goals
The objectives of this laboratory are to:
- Learn how to load a trained object detection model in ROS
- Learn how to run inference on a camera stream
- Learn how to visualize the results
Resources
Model deployment
The model trained in the previous laboratory can be used to detect objects in a camera stream. In this laboratory, you will learn how to deploy the model in ROS and run inference on a camera stream.
And remember, where your code meets the real world… and immediately finds a bug you missed! 🚀 🚀 🚀

It
is just a meme :)
Note: Everything we do today should be done inside the container!
💥 💥 💥 Task 💥 💥 💥
In this task, you will deploy a trained object detection model in ROS.
Requirements
A graphics processing unit (GPU) is required to train the object detection model. If you don’t have an NVIDIA GPU, you can use the CPU version of the container, but the training process will be very slow.
Get the
ros2_detection_gpuorros2_detection_cpuimage:Note: Before you start downloading or building the image, check
docker imagesto see if it has already been downloaded.Option 1 - Download GPU version (CUDA 12.5+) or Download GPU version (CUDA 12.2+) or Download CPU version. Load the docker image with
docker load < ros2_detection_gpu.tar/docker load < ros2_detection_cpu.tar.Option 2 - Build it from the source using repository.
Run the container (GPU or CPU version):
docker_run_detection_gpu.sh
IMAGE_NAME="ros2_detection_gpu:latest"
CONTAINER_NAME="" # student ID number

xhost +local:root

XAUTH=/tmp/.docker.xauth
if [ ! -f $XAUTH ]
then
    xauth_list=$(xauth nlist :0 | sed -e 's/^..../ffff/')
    if [ ! -z "$xauth_list" ]
    then
        echo $xauth_list | xauth -f $XAUTH nmerge -
    else
        touch $XAUTH
    fi
    chmod a+r $XAUTH
fi

docker stop $CONTAINER_NAME || true && docker rm $CONTAINER_NAME || true

docker run -it \
    --env="DISPLAY=$DISPLAY" \
    --env="QT_X11_NO_MITSHM=1" \
    --volume="/tmp/.X11-unix:/tmp/.X11-unix:rw" \
    --env="XAUTHORITY=$XAUTH" \
    --volume="$XAUTH:$XAUTH" \
    --privileged \
    --network=host \
    --gpus all \
    --env="NVIDIA_VISIBLE_DEVICES=all" \
    --env="NVIDIA_DRIVER_CAPABILITIES=all" \
    --shm-size=1024m \
    --name="$CONTAINER_NAME" \
    $IMAGE_NAME \
    bash
docker_run_detection_cpu.sh
IMAGE_NAME="ros2_detection_cpu:latest"
CONTAINER_NAME="" # student ID number

xhost +local:root

XAUTH=/tmp/.docker.xauth
if [ ! -f $XAUTH ]
then
    xauth_list=$(xauth nlist :0 | sed -e 's/^..../ffff/')
    if [ ! -z "$xauth_list" ]
    then
        echo $xauth_list | xauth -f $XAUTH nmerge -
    else
        touch $XAUTH
    fi
    chmod a+r $XAUTH
fi

docker stop $CONTAINER_NAME || true && docker rm $CONTAINER_NAME || true

docker run -it \
    --env="DISPLAY=$DISPLAY" \
    --env="QT_X11_NO_MITSHM=1" \
    --volume="/tmp/.X11-unix:/tmp/.X11-unix:rw" \
    --env="XAUTHORITY=$XAUTH" \
    --volume="$XAUTH:$XAUTH" \
    --privileged \
    --network=host \
    --shm-size=1024m \
    --name="$CONTAINER_NAME" \
    $IMAGE_NAME \
    bash
Preparation
- Download example ROSBAGs files:
bash src/robotics_object_detection/scripts/download_example_bags.bashThe script generates the data directory with the
following ROSBAG files:
bag_car_chase- a car chase videobag_overpass- a video of a car driving under an overpass
- Check available topics in ROSBAG files:
ros2 bag info data/bag_car_chaseThe information will be useful for the next steps.
- Download the trained model.
bash src/robotics_object_detection/scripts/download_model_weights.bashIt downloads the yolo11n.pt model weights into the
src/robotics_object_detection/weights/ directory. If you
want to use your own model, place the model weights from previous
laboratory in the same directory.
Load the model in ROS and run inference
Open the
src/robotics_object_detection/robotics_object_detection/detect_results_publisher.pyfile. All instructions are in the file.Find the class constructor of
DetectResultsPublisher. Create a subscription object to the reade compressed image from a topic.
Note: The goal of the class is to capture the image from the topic, encode it as a numpy array, and run inference on the image.
The self.image_callback function decodes the image, and
next, it calls three functions:
self.infer_image- runs inference on the imageself.publish_results- visualizes the resultsself.write_results- writes the results to a txt file
Find the
self.infer_imagefunction to run inference on the image. It uses theultralyticslibrary, you can find the documentation here. Detailed instructions are in the function definition.Find the
self.publish_resultsfunction to visualize the results. It uses the OpenCV library to draw the bounding boxes on the image. Detailed instructions are in the function definition.Build the package:
colcon build --packages-select robotics_object_detection- Open three terminals in total, attach them to the container, source
the workspace using
source install/setup.bash.
Terminal 1 - play the ROSBAG file (in infinite loop):
ros2 bag play data/bag_car_chase --loopTerminal 2 - run the RQT node to visualize the image (RVIZ can not work with compressed images):
ros2 run rqt_image_view rqt_image_viewIn the rqt_image_view window, select the topic with the
source image.
Terminal 3 - run the detection node:
ros2 run robotics_object_detection detect_results_publisherThe node subscribes to the topic with the source image, runs
inference on the image, and publishes the results to the topic. The
results are visualized in the rqt_image_view window -
change the topic to /camera/detected_image/compressed.
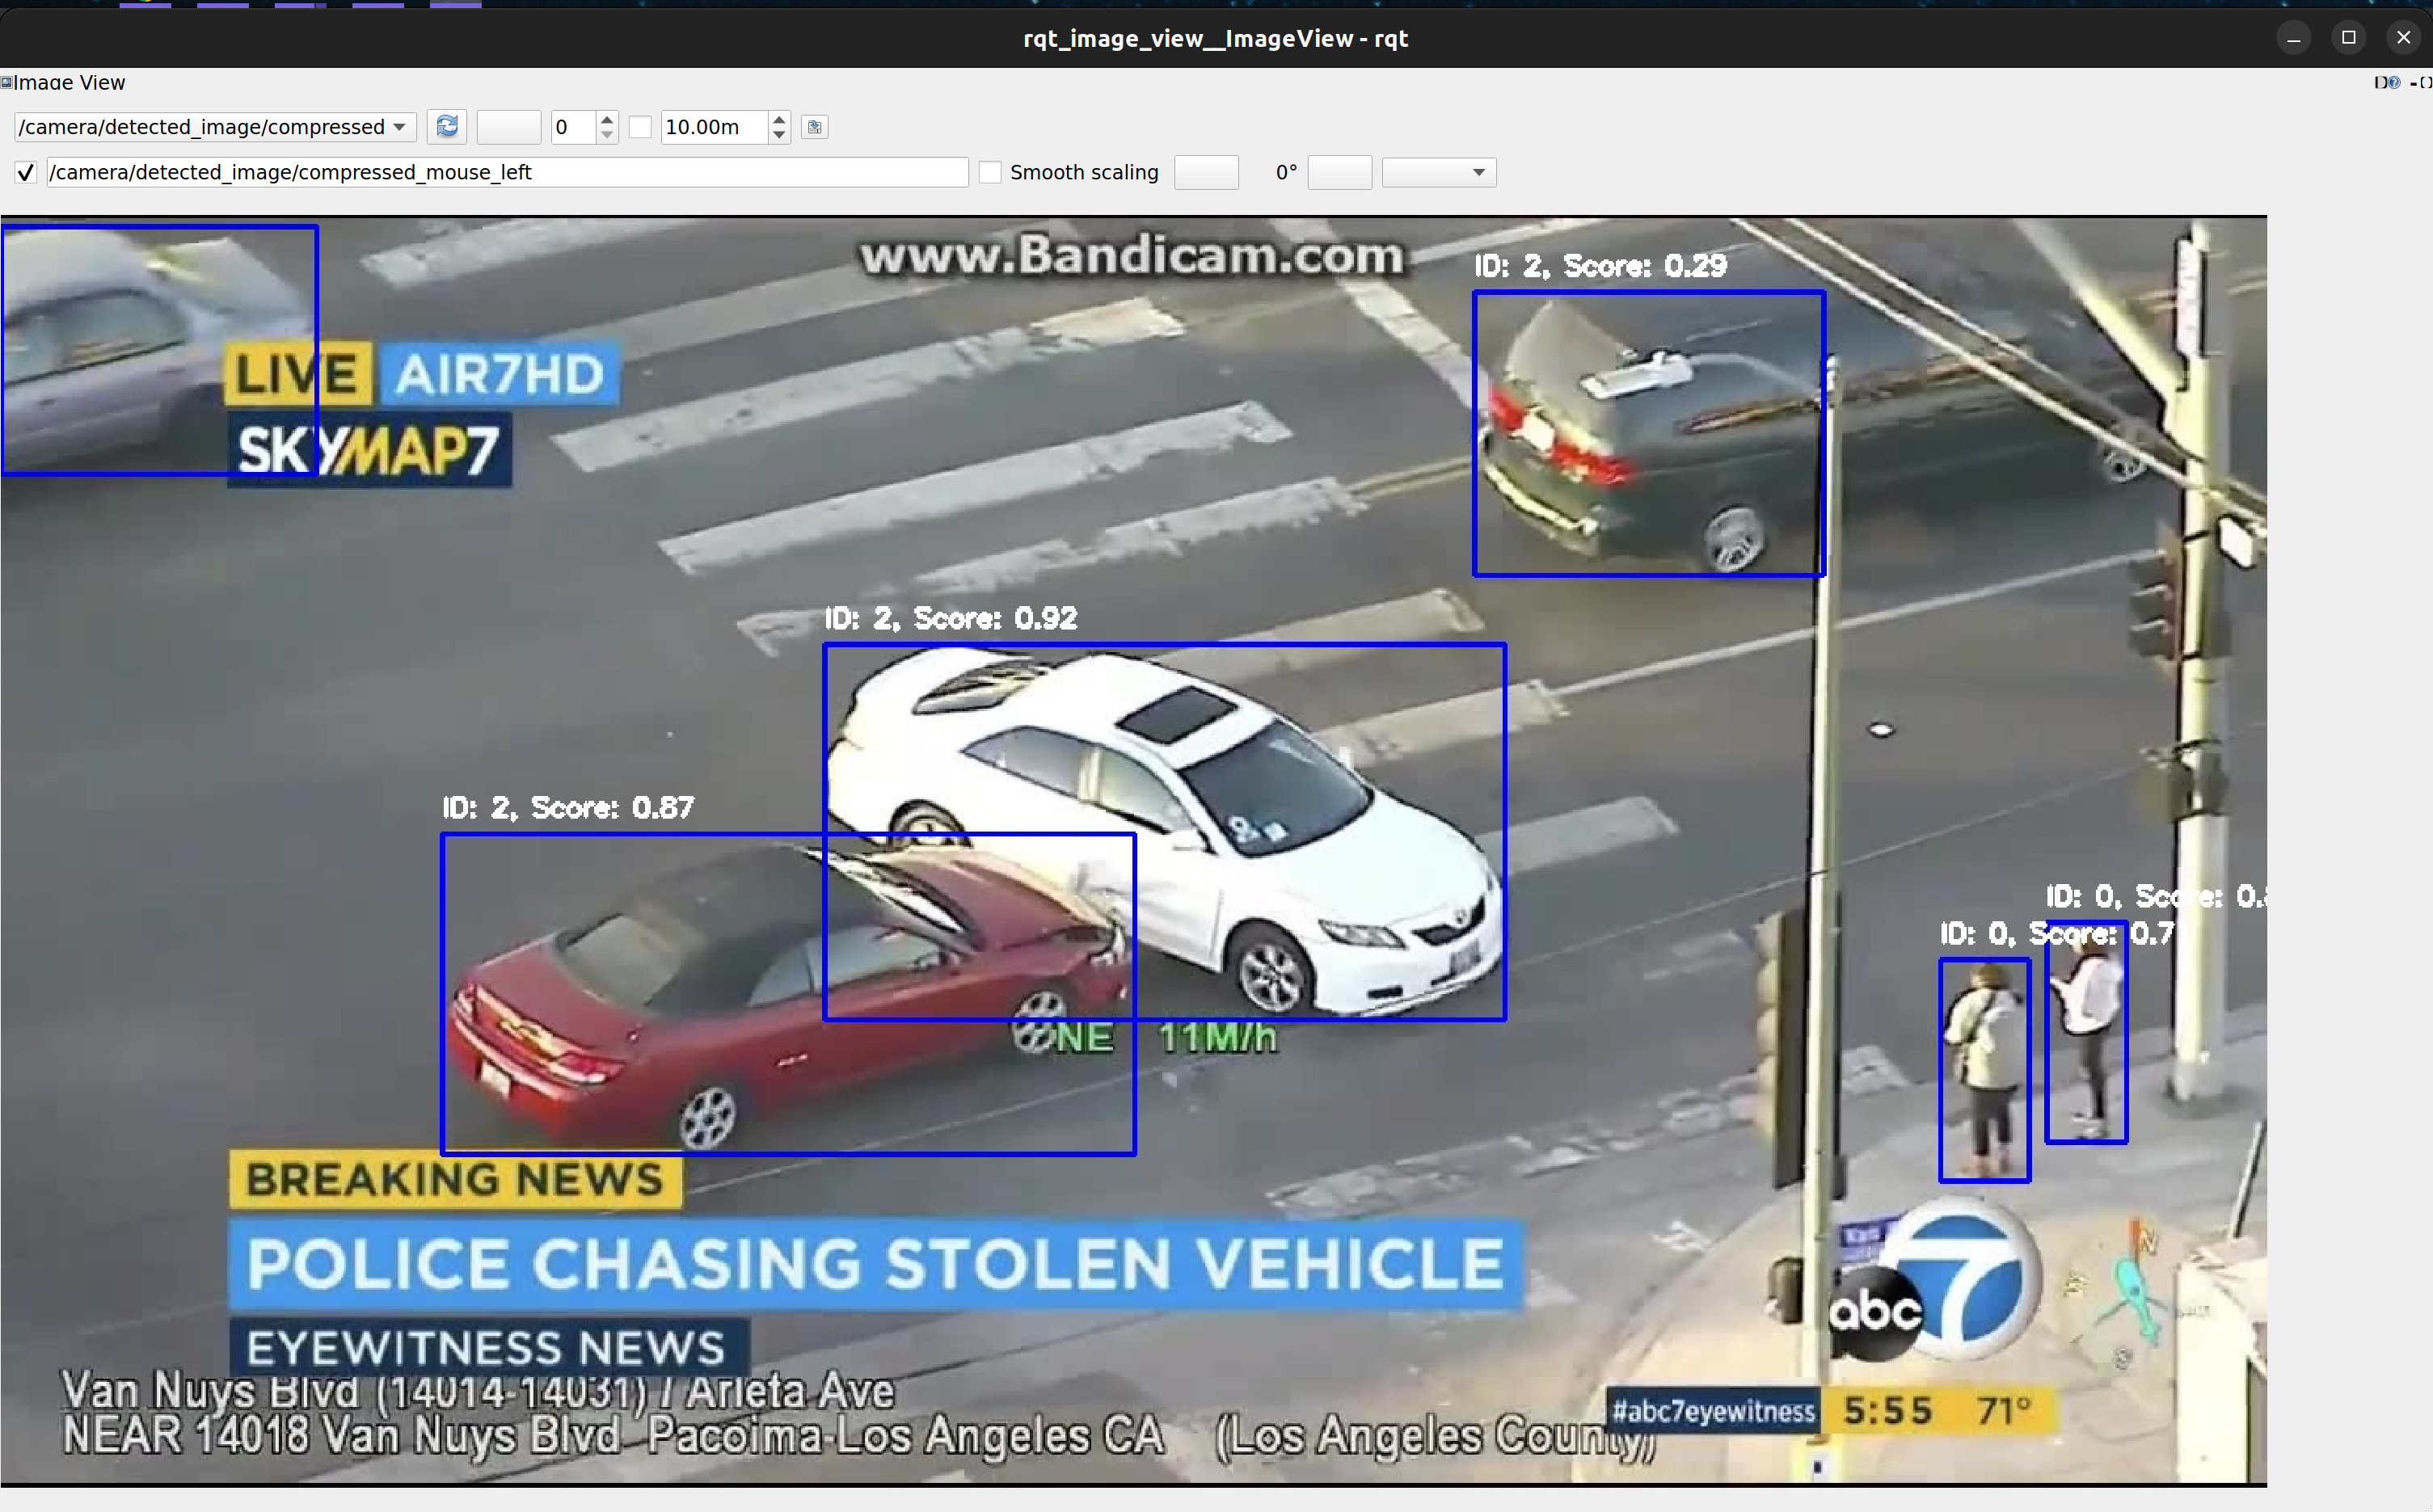
Take a screenshot of the detection results visualised in
rqt_image_view on bag_car_chase.
The image should look like this:
Note: Screenshot does not have to be identical ;)

An example object detection image. Source: Own materials
- Stop the ROSBAG file and the detection node.
Save results to a text file
Open the
src/robotics_object_detection/robotics_object_detection/detect_results_publisher.pyfile.Find the
self.write_resultsfunction. As you can see, the function just calls thewrite_as_csvmethod.Find the definition of the
write_as_csvmethod in theDetectResultsclass. Modify the function to write the results to a txt file in the defined format.Build the package:
colcon build --packages-select robotics_object_detection- Open two terminals in total, attach them to the container, source
the workspace using
source install/setup.bash.
Terminal 1 - run the detection node:
ros2 run robotics_object_detection detect_results_publisherNote: The node has to be run before the ROSBAG file.
Terminal 2 - play the ROSBAG file (just once!):
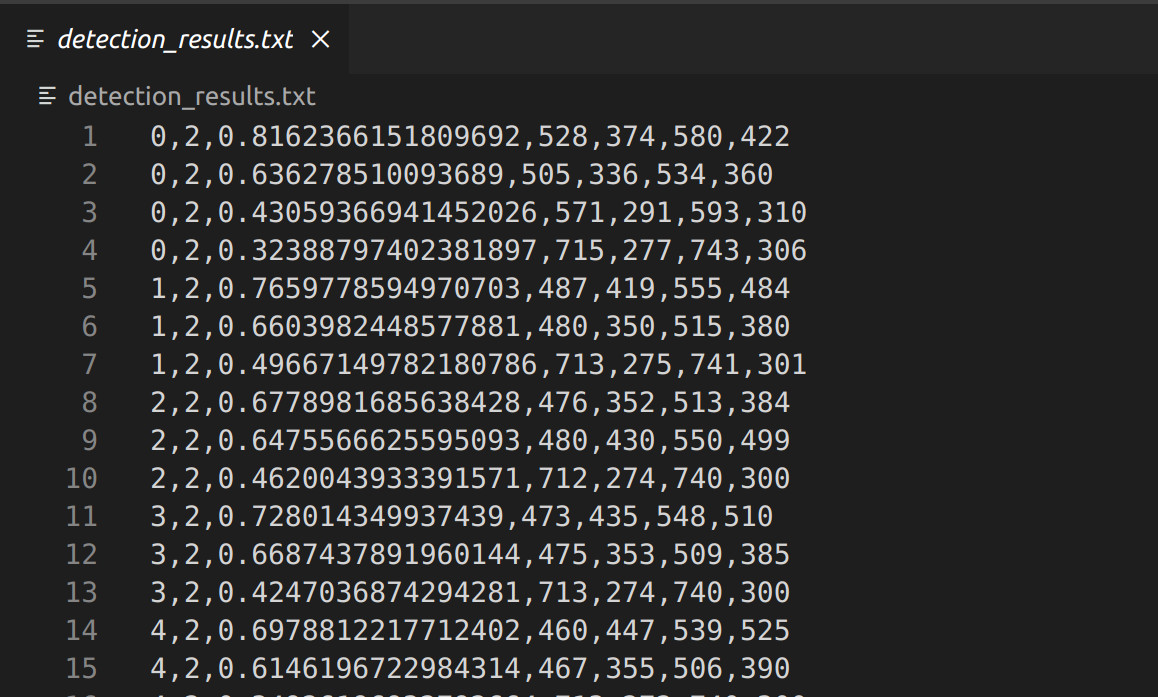
ros2 bag play data/bag_overpass- When the ROSBAG file ends, stop the detection node. It generates the
detection_results.txtfile in your workspace.
The file should look like this:
Note: The file does not have to be identical to the screenshot ;)

An
example file content. Source: Own materials
💥 💥 💥 Assignment 💥 💥 💥
To pass the course, you need to upload the following files to the eKursy platform:
a screenshot of the detection results visualised in
rqt_image_viewonbag_car_chasea txt file with the detection results (the
detection_results.txtfile) forbag_overpass